Archives

Add Availability or Booking Calendar

Using the WP Booking Calendar plugin you can insert a calendar in each property page from where your customers can check the availability of the property or can book a time to visit.

Install WP Booking Calendar

Follow the below steps to install the booking calendar plugin.

  1. On your left sidebar navigate to Plugins > Add new
  2. Search for WP Booking Calendar
  3. Click on Install Now
  4. Click on Activate


Add WP Booking Calendar To a Property

Please follow the below steps to add a booking calendar to properties

  1. Go to Real Estate Manager -> Settings -> Single Property Page -> Property Settings Tabs and create a new tab “Book a Visit”.
  2. Now go to Real Estate Manager -> Property Fields and drag a shortcode field from the left side to the fields list. Provide a title, data name as booking_calendar_shortcode and choose Admin Settings Tab as Book a Visit.
  3. Now when you will edit a property, you will see a new section, here you can provide the shortcode [bookingcalendar] and it will render the booking form on the frontend.

Screenshots to Follow

Saved Searches and Notify

This add-on lets your visitors save the search criteria and then notify them when a listing is available matching that criteria.

After installing and activating, you will see a settings menu as below.

Setup the above settings accordingly and now when a user will search and there will not be enough results, the following form will be displayed.

Site Administrators can access all the saved searches from WP Dashboard -> Real Estate Manager -> Saved Searches. They can see the criteria and also the email address of the visitor. Visitors can manage their saved searches from frontend using the shortcode [rem_saved_searches]

Auto Draft Properties

This addon lets you unpublish properties after being static by the provided number of days.

Once you install this addon, you will see some new fields in the settings menu.

Set up the settings accordingly and it will set the properties to draft after days provided, hiding them for the public users and will send a message to that property’s agent that it’s time to update the property details.

Conditional Fields – Addon

First, please make sure you have installed and activated the Conditional Fields Extension. Then go to the Property Fields menu under the Real Estate Manager of your WordPress dashboard.

Now you will notice that each property field has some extra settings with a checkbox Condition.


Now, let’s display the purpose field only if the Property Type is set to Office.

Set the options as following (Make sure to check the Condition checkbox) and save the settings.

Now you will see that the Purpose field will only display if the Property Type is set to Office. It will apply this condition on the Create/Edit Property Pages and also on the Search Pages.

You can also add multiple conditions and can use Show only if option to check them as ALL or ANY.

Woo Estato – Paid Listings

Woo Estato lets you integrate payment system with your listings. It enables you to set up your site to charge agents for listings on Annually or Monthly basis depending on the number of listings they can publish.

This addon works with the WooCommerce plugin and you can use any payment method provided by the WooCommerce.

How to setup?

First, make sure you have installed and activated both of the following plugins

  1. WooCommerce
  2. WooEstato

Now go to WooCommerce Products and add a new product (we will use it as a single package).

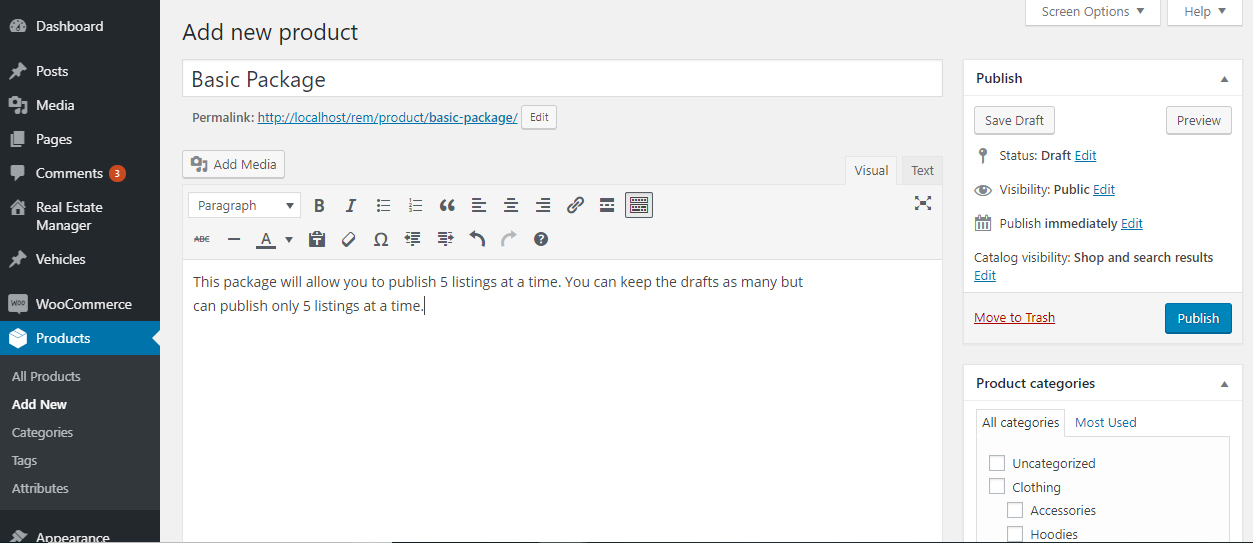
Set the price and other options as per your need. Make sure to check Sold Individually checkbox under the Inventory tab.


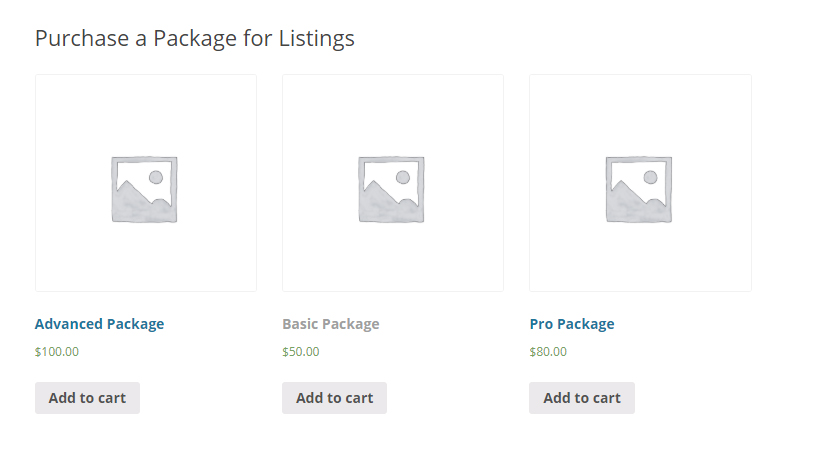
Create the Packages following above steps and providing the prices as per your requirement. Now, suppose we have the following 3 products with prices.

  • Basic Package – $50
  • Pro Package – $80
  • Advanced Package – $100

We will integrate these products with Real Estate Manager using WooEstato now,

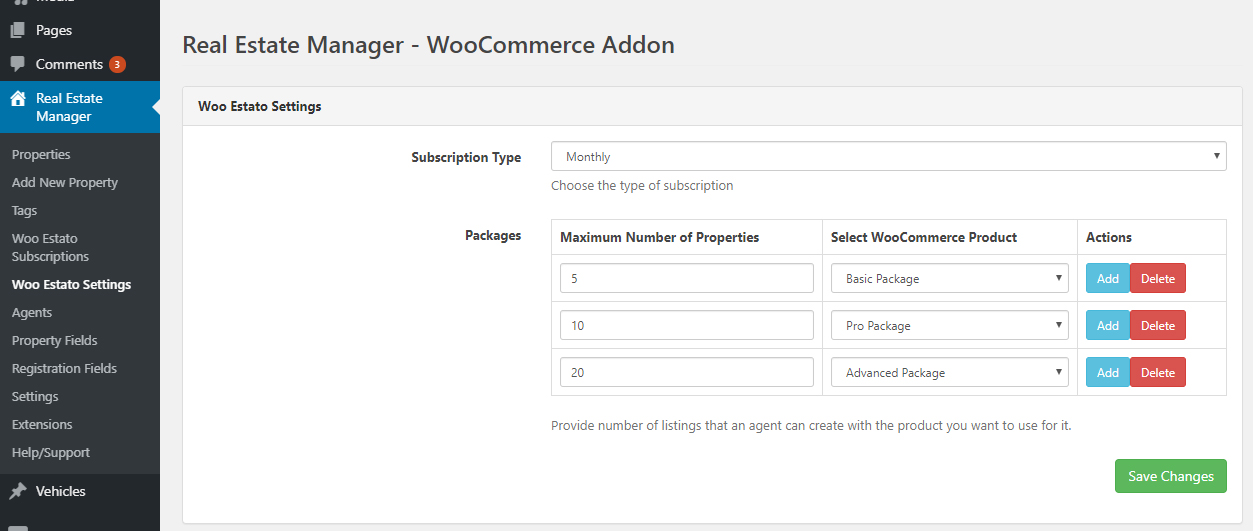
Go to Real Estate Manager -> Woo Estato Settings and choose your subscription type. In the packages menu, and create packages by providing the maximum number of listings and choosing the product next to it and save the settings.

Current Scenario

If you follow the above steps correctly, you will notice that now we have set up a premium listings system as below.

  • 5 Properties in $50 per month
  • 10 Properties in $80 per month
  • 20 Properties in $100 per month

Display Packages

Create a new page where you will display these packages. We have attached these products to a tag named woo estato, just to get only these products in the shortcode.

On the frontend, it will display our packages to purchase.

Agent Purchase Flow

When you will enable the subscription, the agents will no longer be able to create publish the listings. Please note that they can create the listings but they will remain draft as long as they purchase a package.

Let’s see an example below,

We have an Agent named John. He purchases the Basic Package, when his order will complete, we will be able to publish 5 properties at a time. Whenever he will try to create properties more than that, they will become automatically as a draft.
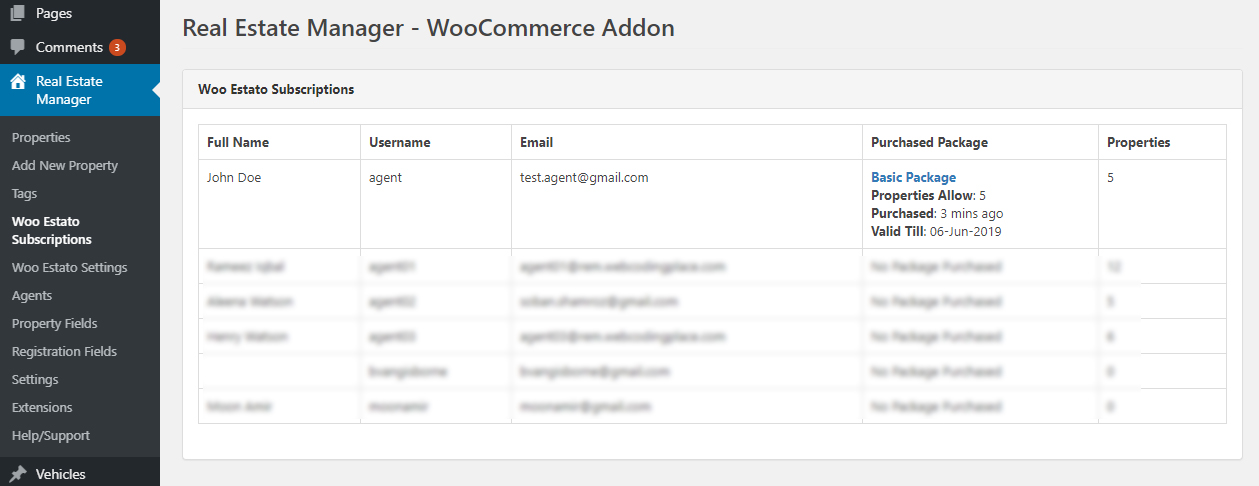
Purchases Details

You can see the details of agents and their purchased packages from Woo Estato Subscriptions menu.

How Agent can see his purchased package?

You can use the shortcode [rem_packages] to display details of the current logged in user.

Wish-list Addon

Installation

  1. Download the plugin zip file here (rem-wishlist.zip)
  2. Log in to your site -> Plugins -> Add New
  3. Click on Upload Plugin button and choose the file downloaded above
  4. Click on Install, and then Activate the plugin.

After installing and activating this addon, properties will display a wishlist icon.

  • Listing archives will display wishlist icon with the details button
  • Single properties will display it under the slider.

Listing Archives

Single Property Page

Whenever a user will click on wishlist button, it will add that listing into their wishlist (browser cache). You can use the shortcode [rem_wishlist] to display these listings to them.

Create a page named Wishlist and add it into your site’s menu. Now edit that page and paste the following shortcode into the content area

[rem_wishlist]

This page will display the properties added to the wishlist of users with the contact form to bulk contact their agents.

Property Listing Styles

Property Listing Styles provides you additional listings styles for your property archives and listings.

You just have to install and activate this addon and can use the additional styles in the existing shortcodes using attribute style without any configuration.

You can use from 8 to 16 in the style attribute, for example following shortcode

[rem_carousel style="16" slidestoshow="2" arrows="enable"]

will display the slider as following

Filterable Properties Grid

FIlterable Properties Grid lets you showcase your properties in an animated and sortable layout.

Just install and activate this addon and use the following shortcode to use it.

[rem_filterable_grid]

It will display your properties something like this

All Available Attributes

Following attributes are available for the shortcode [rem_filterable_grid]

Attribute Default Value Description
filter_by property_type Here you can provide the field name, the available values of that field will become top buttons
price_filter disable Enable or Disable price filtering here. You can use enable or disable
display_all yes Do you want to display All button? Provide yes or no
display_all_label ALL Provide the label here for All button
order ASC ASC or DESC
orderby date How you want to order properties
columns 3 Provide a number of columns for each row here
style 3 Property listing style
total -1 The number of total properties to display
meta Please read using meta attribute
active Provide key here for default active
price_range_class col-md-3 Columns class for price range wrapper
buttons_wrap_class col-md-9 Columns class for filter buttons wrapper
animation fade translateZ(-100px) Animation for property boxes
duration 700 Animation duration in milliseconds for property boxes
min_price The minimum price for the slider that can be selected
min_price_a Minimum active price for the slider
max_price The maximum price for the slider that can be selected
max_price_a Maximum active price for the slider
btn_bg_color The background color of the filtering buttons
btn_text_color Text color for the filtering buttons
btn_bg_active_color Background color for the filtering buttons for active state
btn_text_active_color Text color for the filtering buttons for active state
slider_bg_color Price slider background color
slider_handle_color Price slider handles color
slider_badge_bg_color Price slider background color for the badge
slider_badge_text_color Price slider text color for the badge

Below are some examples for the quick start

Centering the top buttons

[rem_filterable_grid buttons_wrap_class="col-sm-12"]

Enable the Price Range Slider

[rem_filterable_grid price_range_class="col-sm-12" buttons_wrap_class="col-sm-12" price_filter="enable"]