Archives

Property Fields loses some settings when saved

The cause of this problem is the small value of the “max_input_vars” option in the configuration of your server (host). You should increase the value of the “max_input_vars“. You need to set a larger value. You can try to increase it in one of the ways that are described below.

  • Most hosts have the opportunity to change this value in the “Host Admin Area”.
    Example:
    If currently you have max_input_vars = 1000
    You need to set max_input_vars = 9000
  • You can try to change this value using the “.htaccess” file in the root directory of your site. Add the following lines of the code at the end of “.htaccess” file:
    php_value max_input_vars 9000
    php_value suhosin.post.max_vars 9000
    php_value suhosin.request.max_vars 9000
  • You can try to change this value using “php.ini”. Try to find “max_input_vars” and change the value for this variable. If the line of the code in your “php.ini” look like this:
    ; max_input_vars = 1000

    Then change it to the following:

    max_input_vars = 9000
  • If that does not help you, ask your host support “How can I increase the value of the max_input_vars for my site?”

How to add 360 Virtual Tour?

First, you have to create a separate section. Go to Settings -> Single Property Page -> Property Settings Tabs and provide section name there.

Then, you have to create a field inside that section. For this purpose, please go to Property Fields menu and drag a Shortcode field, set appropriate title and data name (title will not appear on the frontend) and choose the newly created section from Admin Setting Tab. Now save the changes.

Now, when you will edit a property, you will see a new text field under a new section. You can provide the iframe or other code from any 3rd party 360 tour service to that field and it will render it on the frontend.

How to setup Ribbons properly?

If you’re using the pro version, you can follow the below steps to configure ribbons easily.

First, create a custom field for managing ribbons, choose the tab to Private Fields to disable it for public users and provide an appropriate Data Name and remember it.

Now you have to configure this field to be used as the ribbon text. For this, Go to Settings -> Listing Ribbons and provide the following values accordingly.

  • Custom Ribbon : ribbon_text=ANY
  • Custom Ribbon Text : ribbon_text

Here, ribbon_text is the Data Name of the field you just created.

Now, you just have to provide the text in that field and it will appear as the ribbon.

Why all the text is red and strange fonts?

You may have experienced this strange issue when using shortcodes, that all the fonts are red and there are some strange fonts as shown below.

Its because there are some special tags wrapping the actual shortcode. To fix this you have to remove them. Mostly its a code tag and can be shown by clicking on the text tab of the editor.

Just remove that code tag that and it will resolve this issue.

How to customize the Property Page?

This quick tutorial will guide you to customize the Single Property Page according to your theme’s design. We will take the Twenty Nineteen Theme as an example here.

First, you have to make a duplicate of the page.php file. Go to your theme files using FTP or Control Panel (in our case it’s inside wp-content/themes/twentynineteen). Create a file named single-rem_property.php and put the inner contents of the page.php file there.

Now you have to load this file instead of the default Property Template. For this, go to Settings -> Template Settings -> Property Page Template and choose From Theme. Then previewing the property page you will only see the contents. So, we have to integrate the property contents also (eg: meta).

Open the single-rem_property.php file in a text editor and you will see the following code

<?php
/**
 * The template for displaying all single posts
 *
 * @link https://developer.wordpress.org/themes/basics/template-hierarchy/#single-post
 *
 * @package WordPress
 * @subpackage Twenty_Nineteen
 * @since 1.0.0
 */

get_header();
?>

	<section id="primary" class="content-area">
		<main id="main" class="site-main">

			<?php

			/* Start the Loop */
			while ( have_posts() ) :
				the_post();

				get_template_part( 'template-parts/content/content', 'page' );

				// If comments are open or we have at least one comment, load up the comment template.
				if ( comments_open() || get_comments_number() ) {
					comments_template();
				}

			endwhile; // End of the loop.
			?>

		</main><!-- #main -->
	</section><!-- #primary -->

<?php
get_footer();

We will make the changes inside the loop.

Suppose you want to display the property type, you will use the function rem_get_field_value for getting the data. In our case, property type field has a data name as property_type so our code will become

<?php
/**
 * The template for displaying all single posts
 *
 * @link https://developer.wordpress.org/themes/basics/template-hierarchy/#single-post
 *
 * @package WordPress
 * @subpackage Twenty_Nineteen
 * @since 1.0.0
 */

get_header();
?>

	<section id="primary" class="content-area">
		<main id="main" class="site-main">

			<?php

			/* Start the Loop */
			while ( have_posts() ) :
				the_post(); ?>
				<div class="entry-content ich-settings-main-wrap">
					<?php echo rem_get_field_value( 'property_type' ); ?>
				</div>
			<?php endwhile; // End of the loop.
			?>

		</main><!-- #main -->
	</section><!-- #primary -->

<?php
get_footer();

Similarly, you can get any field’s data.

The Following 2 hooks can also be used to display the default slider and sections.

<?php
/**
 * The template for displaying all single posts
 *
 * @link https://developer.wordpress.org/themes/basics/template-hierarchy/#single-post
 *
 * @package WordPress
 * @subpackage Twenty_Nineteen
 * @since 1.0.0
 */

get_header();
?>

	<section id="primary" class="content-area">
		<main id="main" class="site-main">

			<?php

			/* Start the Loop */
			while ( have_posts() ) :
				the_post(); ?>
				<div class="entry-content ich-settings-main-wrap">
					<?php do_action( 'rem_single_property_slider', get_the_id() ); ?>
					<?php do_action( 'rem_single_property_contents', get_the_id() ); ?>
				</div>
			<?php endwhile; // End of the loop.
			?>

		</main><!-- #main -->
	</section><!-- #primary -->

<?php
get_footer();


Manage Properties from Frontend

In this article, I will guide you to create user pages or agent pages for frontend management. First, you have to create pages. Please go to Pages -> Add New from your WordPress dashboard and create following pages. You can provide any title, but use the shortcodes given below respectively.


Page Title Content (Shortcode)
My Properties [rem_my_properties][rem_agent_login][/rem_my_properties]
Edit Property [rem_edit_property][rem_agent_login][/rem_edit_property]
Edit Profile [rem_agent_edit][rem_agent_login][/rem_agent_edit]

Link Edit Property Button

Now the important thing is to link the edit property button on the My Properties page. Please go to Real Estate Manager -> Settings -> Template Settings -> Edit Property Page and choose that page here which you recently created for Edit Property.

You can read more details on this page, under heading Edit Property Page


Use meta attribute in the shortcodes

Some shortcodes have meta attribute to display properties with advanced filtering. You can list properties using any custom fields and values. Following shortcodes support meta attribute at the moment.

  • [rem_list_properties]
  • [rem_carousel]
  • [rem_maps]

Single Field Value

You can provide a single field and a value separated by a pipe sign in the meta attribute to get those listing. Suppose we want to display only rented properties using one of the shortcode listed above. So, these properties will be those which have the Property Purpose set to Rent. We will use the meta attribute like this

meta="property_purpose|Rent"

Please note that the value and field names both are case sensitive.

Multiple Fields and Values

You can also provide multiple field value groups in the meta attribute separated by commas. Suppose we want to display all those properties having the Country set to Australia and the City set to Sydney. We will use it like this

meta="property_city|sydney,property_country|australia"

Single Field with Multiple Values

Let go further into this, we may have a scenario where we only want to list the houses and offices. Technically they will be those properties having Property Type set to either House or Office. We will provide the field name only once and will separate the values by a steric sign. So, it will be like this

meta="property_type|House*Office"

Exclude a Value

You may experience a situation where you need to display all the listings, excluding a specific once. For example, you don’t want to display the houses from property types. You can do this using the exclamation mark.

meta="property_type|!House"

Exact Match Value

You may experience a situation where you need to exactly match the value. For example, you may have 2 options for Types as House and Open House. Now you want to display only Houses, not Open House. You can do that using the hash sign.

meta="property_type|#House"

Phone Number not Working

In some agent cards, there are phone icons which on clicking directly make a call from the phone or the desktop available apps. Please make sure to provide the phone number in the following format.

tel:+923477554492

you can also use callto attribute for Skype calls

callto:+923477554492

Agent Contact Form & Contact Form 7

An agent contact form is displayed in two places by default.

  1. Single Property Page
  2. Agent Page

You can set up its settings by going to Settings -> Agent Contact Form but at some point, you may need to customize it. You may want to add some fields into the contact form or want to remove the default ones. It’s not a good idea for us to develop a separate system to manage contact forms and their fields, so let’s leave it to other famous plugins. Real Estate Manager has support for 3rd party contact form plugins also. We will take the Contact Form 7 as an example here.

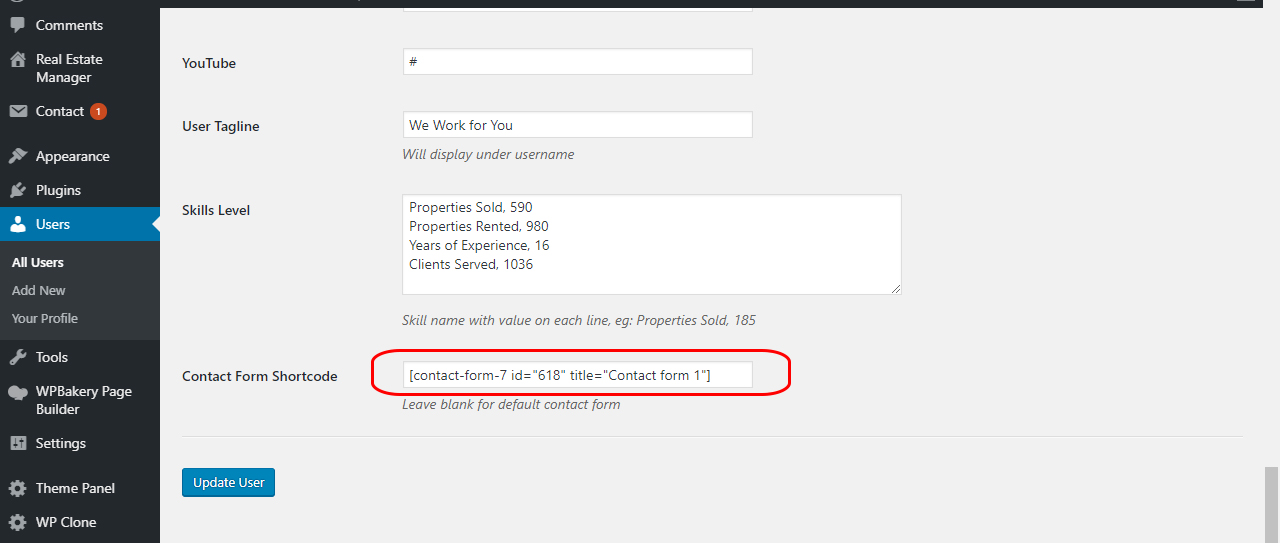
First, you have to create a form using contact form 7, follow its documentation. After creating a form you will get a shortcode to render that form. Suppose it is

[contact-form-7 id="1234"]

Now go to Users -> Your Profile -> Contact Form Shortcode and paste that shortcode here. Now when you will visit your properties or will visit your profile page, this form will render. That’s it.

Using Special Tags

As you know you can use the special tags in the default form to get Property URL, ID, etc. So, you may want to get these with the Contact Form 7 also. For this purpose, you can use one of the following methods

  1. Using plugin Contact Form 7 Dynamic Text Extension
  2. Adding some code in your theme’s functions.php file (Using the Hook wpcf7_before_send_mail)

1. Using Contact Form 7 Dynamic Text Extension

Make sure you have installed and activated both Contact Form 7 and Contact Form 7 Dynamic Text Extension Plugins.

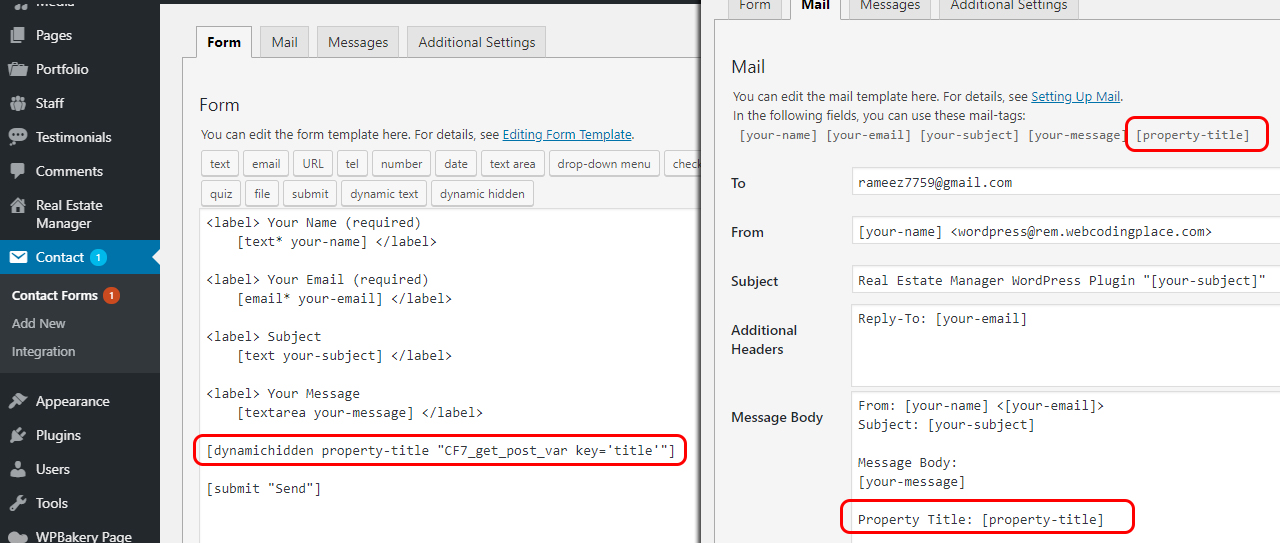
Display Property Title in the Contact Form

There are two steps involved

  1. First, make a hidden field in the form using dynamichidden tag
  2. Then use it in the actual message.

Go to your Contact Form 7 form and edit it. On the Form, tab paste the following code

[dynamichidden property-title "CF7_get_post_var key='title'"]

Now go to the Mail tab and paste the following where you want to display the Property Title

[property-title]

Similarly, you can display the Property URL using

[dynamictext property-url "CF7_URL"]

and any custom field data of the current property using

[dynamictext property-price "CF7_get_custom_field key='rem_property_price'"]

2. Using the Hook wpcf7_before_send_mail

We’re working on this part and will update this document soon.

How to display Featured Properties

You can use the meta attribute of the shortcode to display featured properties. Featured properties are those whose Featured option is set to Yes. The following shortcode will display featured properties in a grid.

[rem_list_properties meta="property_featured|Yes" class="col-sm-4" style="3"]

Similarly, you can use the same attribute for slider also.

[rem_carousel meta="property_featured|Yes" class="col-sm-4" style="3"]